特别声明:未经授权,禁止转载。
本文所使用的TensorFlow代码库commit id为f270180a6caa8693f2b2888ac7e6b8e69c4feaa8(r2.1分支)。
XLA功能概览
- tensorflow/compiler/aot
- AOT方式使用XLA,通过
tfcompile命令实现1。
- AOT方式使用XLA,通过
- tensorflow/compiler/jit
- JIT方式使用XLA,通过设置
tf.ConfigProto().graph_options.optimizer_options.global_jit_level = tf.OptimizerOptions.ON_1或者使用xla.compile接口实现。 - 三个算子:
XlaCompileOp、XlaRunOp和XlaMergeOp,其中XlaCompileOp通过tf2xla完成编译功能,XlaRunOp通过xla/client完成运行功能。 - 11个优化pass:
BuildXlaOpsPass、CloneConstantsForBetterClusteringPass、ClusterScopingPass、EncapsulateSubgraphsPass、EncapsulateXlaComputationsPass、IncreaseDynamismForAutoJitPass、IntroduceFloatingPointJitterPass、MarkForCompilationPass、PartiallyDeclusterPass、ReportClusteringInfoPass、FunctionalizeControlFlowForXlaPass。
- JIT方式使用XLA,通过设置
- tensorflow/compiler/tf2xla
- 提供
XlaCompiler::CompileFunction(xla_compiler.cc)接口,用于将适合被JIT编译的计算图区域(cluster)转化为XlaComputation。其核心是通过调用XlaCompiler::CompileGraph接口使用ExecuteGraph函数完成XlaOpKernel的符号执行2。 - 符号执行时会调用每个
XlaOpKernel子类的Compute函数,进而调用其Compile成员函数。Compile函数的功能描述如下:- 从
XlaOpKernelContext中取出XlaExpression或XlaOp,调用xla/client/xla_builder.h提供的方法执行计算(编译), 最后将完成计算的最终XlaOp存入XlaKernelContext中作为输出。
- 从
- 提供
- tensorflow/compiler/xla/client
- 提供
xla::XlaBuilder功能以及预定义的XLA元算子(xla_builder.cc),供XlaCompiler::CompileFunction使用,即将由Op表达的Graph转化为HloModuleProto表达并将其保存在XlaComputation中。 - 提供
LocalClient::Compile(local_client.cc)接口,并将其作为JIT编译的入口,供XlaCompilationCache::BuildExecutable接口(xla_compilation_cache.cc)使用。LocalClient::Compile接口将已经得到的XlaComputation交给LocalService::CompileExecutable(locla_service.cc)进行编译以得到二进制(LocalService::CompileExecutable会进一步调用BuildExecutable接口)。 - 提供
LocalExecutable::Run接口(local_client.cc),作为运行入口供XlaRunOp(xla_ops.cc)使用,通过Key找到相应的二进制交给service层处理(GpuExecutable/CpuExecutable)。
- 提供
- tensorflow/compiler/xla/service
- 提供
Service::BuildExecutable(service.cc)功能,供LocalClient::Compile使用以实现真正的编译。具体编译过程描述如下:BuildExecutable将XlaComputation封装的HloModuleProto转化为HloModule表达,并对其进行优化。- 接着将HloModule转为
llvm::Module,并调用CpuCompiler::RunBackend(cpu_compiler.cc)或GpuCompiler::RunBackend(gpu_compiler.cc)将其编译为相应平台的Executable二进制。
- 提供
Executable::ExecuteOnStream(executable.cc),其为LocalExecutable::Run接口提供了真正的二进制执行实现。
- 提供
- tensorflow/compiler/mlir
- 提供tf、tflite以及xla使用的mlir方言和相关工具
- tensorflow/compiler/xrt
- XRT是一个同时支持多个计算引擎的运行时加速库,目前已经集成了TensorFlow XLA和Nvidia TensorRT两个后端引擎。其中XLA全面支持训练和预测,TensorRT支持预测以及部分算子支持训练。对于同一个计算图,XRT允许多个计算引擎联合使用,以获得更好的加速效果。
XLA完整执行流程分析
示例代码
1
2
3
4
5
6
7
8
9
10
11
12
13
14
15
16
17
18
19
20
21
22
23
24
25
26
27
28
29
30
31
32
33
34
35
36
37
38
39
40
41
42
43
44
# scope_xla.py
import numpy as np
from tensorflow.python.client import timeline
from tensorflow.python.compiler.xla import jit
import tensorflow.compat.v1 as tf
tf.disable_v2_behavior()

def nn_block(input_tensor_0):
    op_0_0 = tf.square(input_tensor_0)
    op_1_1 = tf.matmul(op_0_0, op_0_0)
    op_1_0 = tf.subtract(op_1_1, op_1_1)
    op_2_0 = tf.add(op_1_0, op_1_1)
    return op_2_0

def nn(input_tensor_0):
    for i in range(0, 1):
        tmp = input_tensor_0
        input_tensor_0 = nn_block(tmp)
    return input_tensor_0

def test_scope():
  x = tf.placeholder(tf.float32, [None, 2])
  with jit.experimental_jit_scope(compile_ops=True):
    output = nn(x)

  run_metadata = tf.RunMetadata()
  with tf.Session() as sess:
    tf.global_variables_initializer().run(session=sess)

    data = np.array([[1, 2],
                     [3, 4]])
    # data = np.random.rand(2, 2).astype('float32')
    res = sess.run(output,
             feed_dict={x: data},
             options=tf.RunOptions(trace_level=tf.RunOptions.FULL_TRACE),
             run_metadata=run_metadata)
    print(res)

    trace = timeline.Timeline(step_stats=run_metadata.step_stats)
    with open('./timeline.ctf.json', 'w') as trace_file:
      trace_file.write(trace.generate_chrome_trace_format())

if __name__ == '__main__':
  test_scope()
- 执行脚本如下:
1
2
3
4
5
6
7
8
9
10
11
12
13
14
#!/usr/bin/env bash
set -ex

CUDA_VISIBLE_DEVICES=0                      \
TF_CPP_MIN_LOG_LEVEL=0                      \
TF_CPP_VMODULE=cuda_driver=2                \
TF_DUMP_GRAPH_PREFIX="./graph_dump_path"    \
TF_XLA_FLAGS="--tf_xla_clustering_debug"    \
XLA_FLAGS="--xla_dump_to=./xla_scope_output
           --xla_dump_hlo_pass_re=.*
           --xla_dump_hlo_as_text
           --xla_dump_hlo_as_html
           --xla_dump_hlo_snapshots"        \
python -u scope_xla.py
执行流程梳理
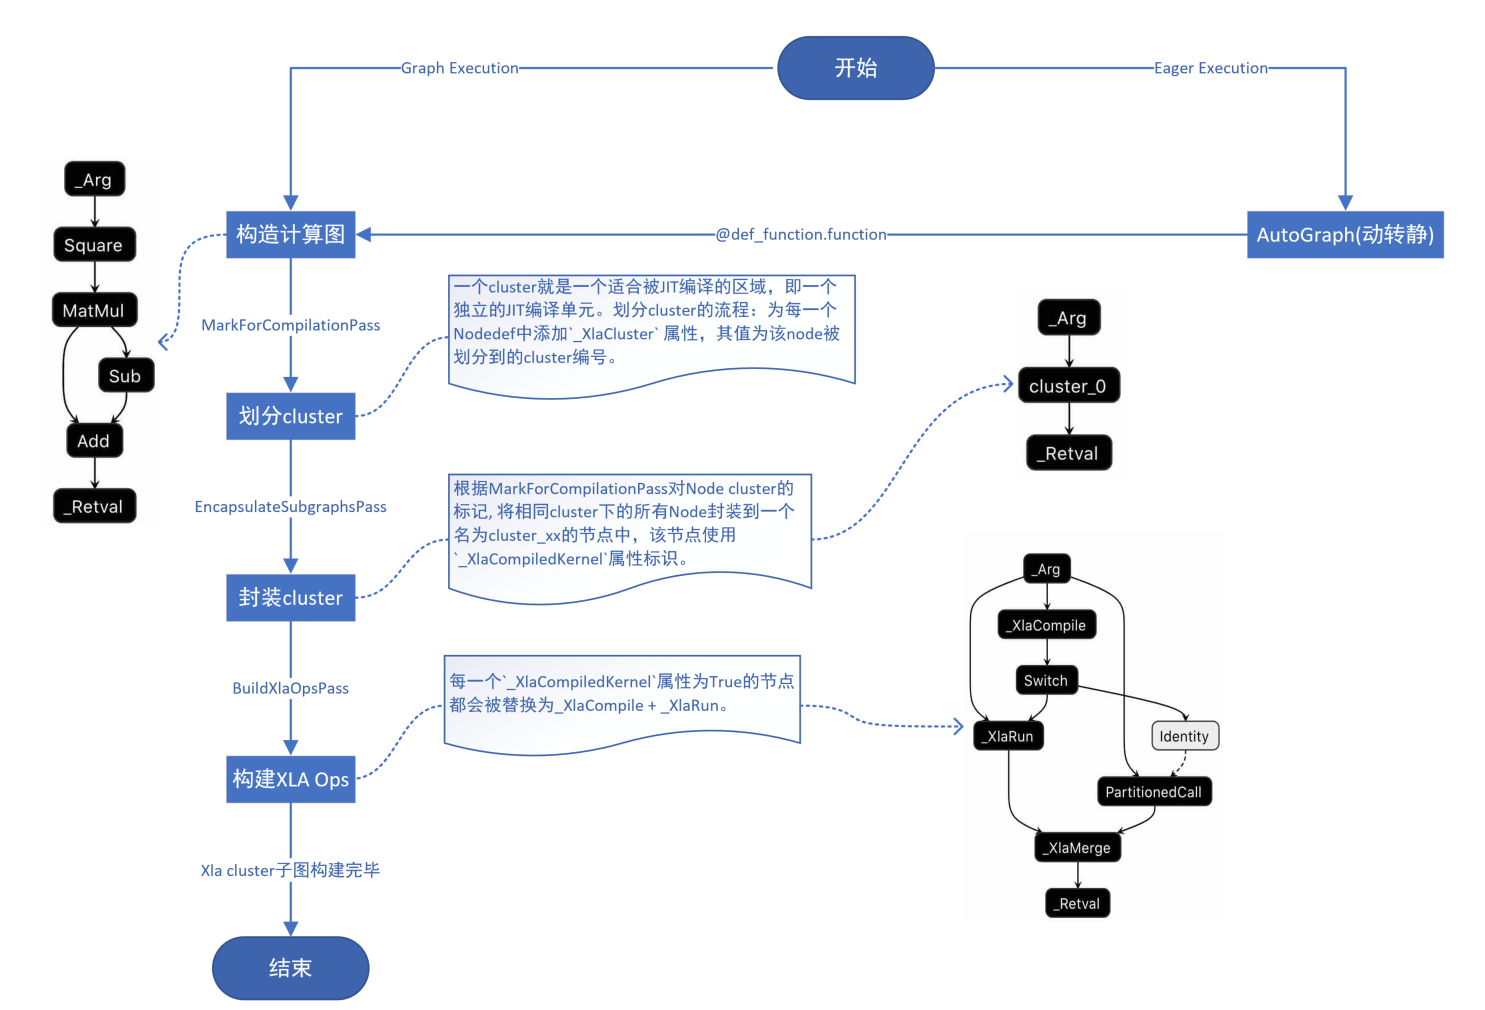
- Xla cluster子图构建流程

-
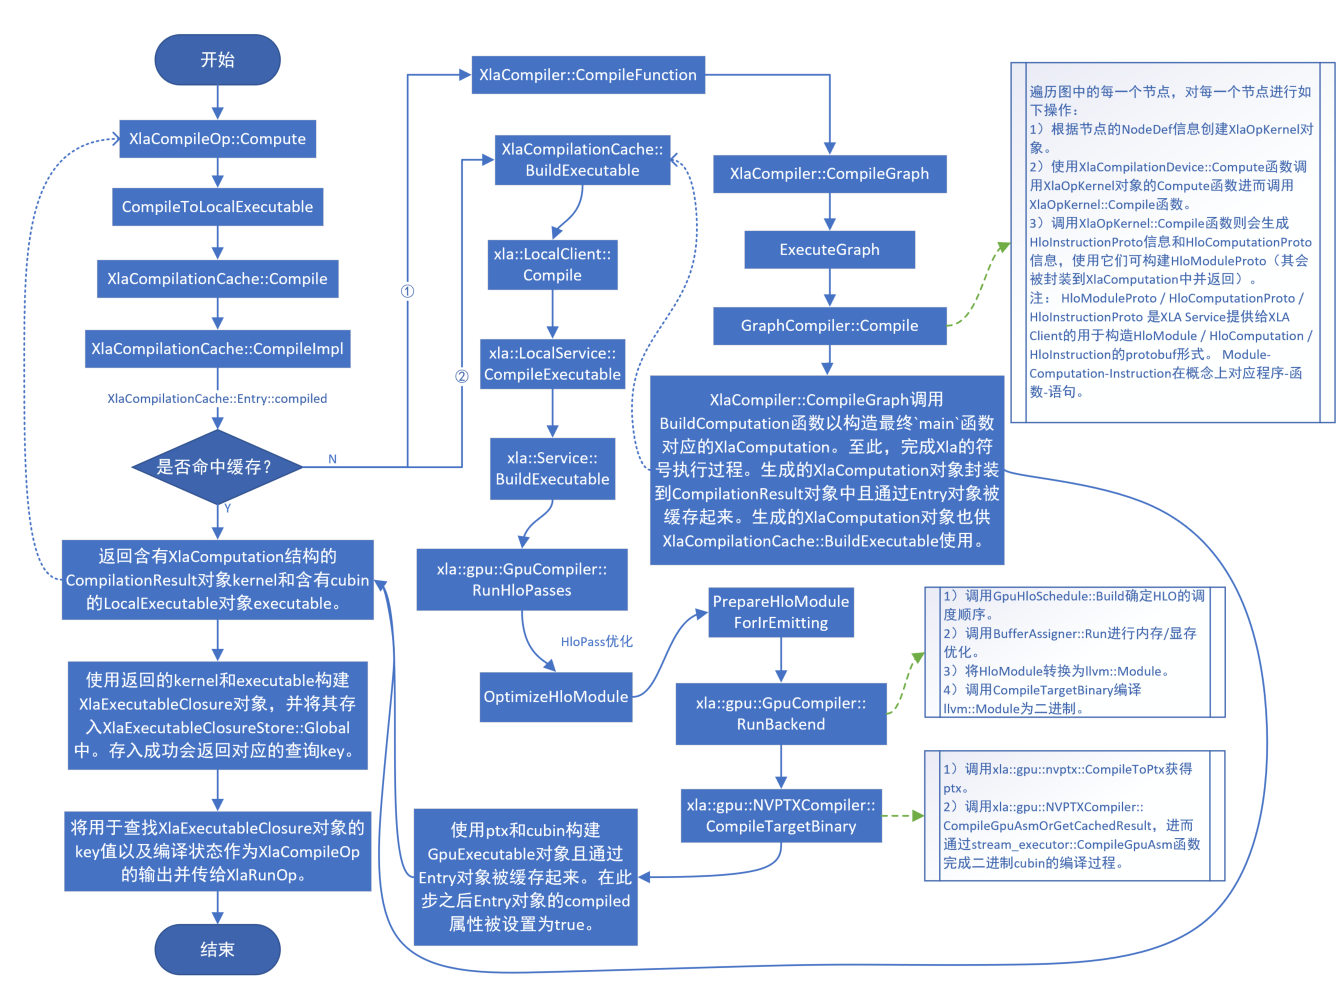
XlaCompile执行流程

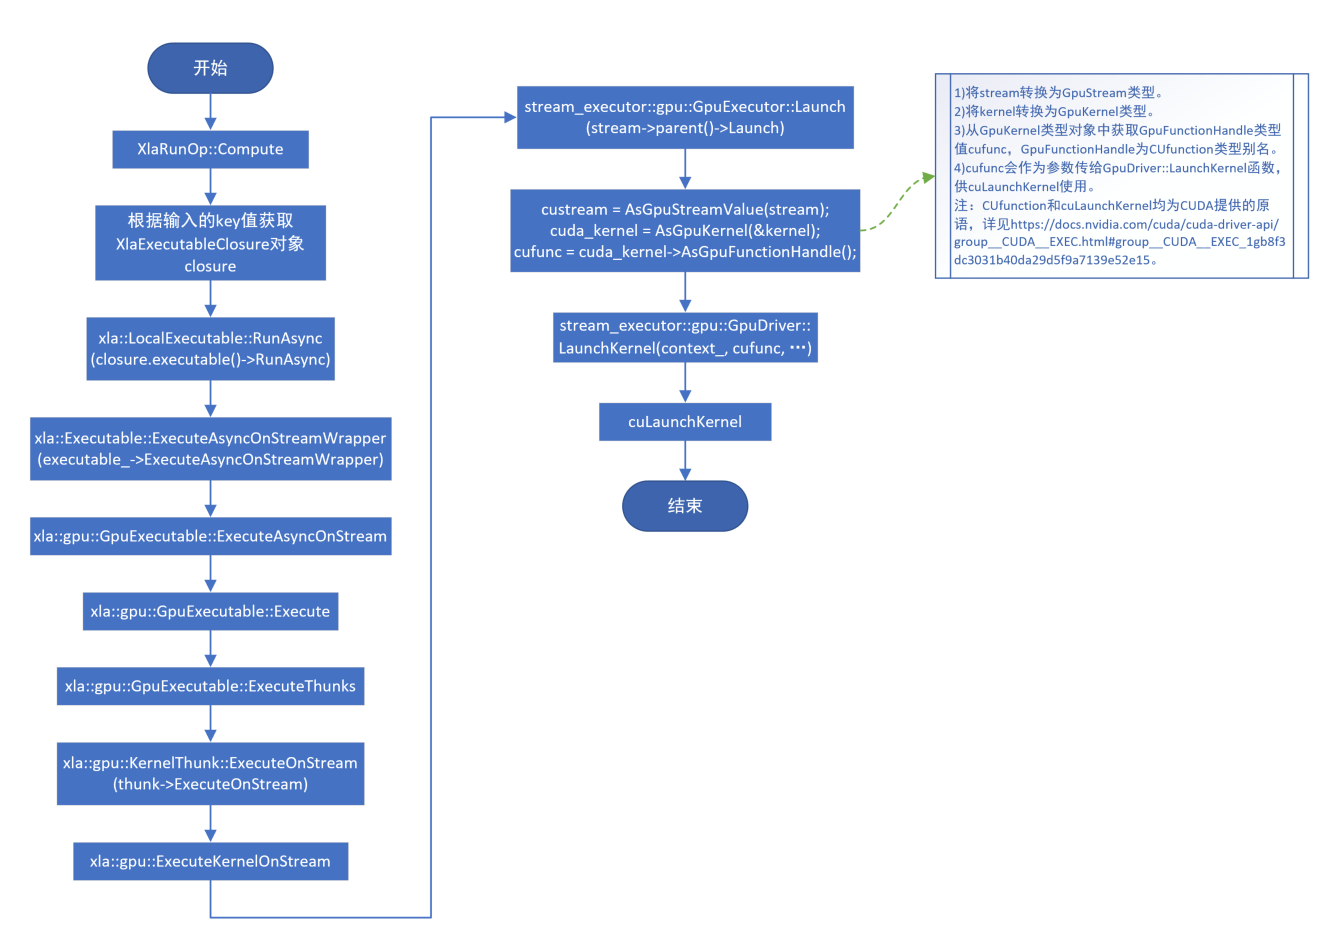
- XlaRun执行流程

XLA中使用NVTX
- 修改tensorflow/core/profiler/internal/gpu/nvtx_utils.h文件,在
namespace tensorflow::profiler命名空间中添加如下内容:
1
2
3
4
5
6
7
8
9
class RecordEvent {
 public:
  RecordEvent(const std::string& name);
  ~RecordEvent();
};

void ProfilerRangePush(const std::string& name);

void ProfilerRangePop();
- 修改tensorflow/core/profiler/internal/gpu/nvtx_utils.cc文件,在
namespace tensorflow::profiler命名空间中添加如下内容:
1
2
3
4
5
6
7
8
9
10
11
12
13
14
15
RecordEvent::RecordEvent(const std::string& name) {
  nvtxRangePushA(name.c_str());
}

RecordEvent::~RecordEvent() {
  nvtxRangePop();
}

void ProfilerRangePush(const std::string& name) {
  nvtxRangePushA(name.c_str());
}

void ProfilerRangePop() {
  nvtxRangePop();
}
- 在需要使用nvtx打tag的源码中引入头文件
tensorflow/core/profiler/internal/gpu/nvtx_utils.h,如下所示:
1
2
3
4
5
6
7
8
9
10
11
12
13
#include "tensorflow/core/profiler/internal/gpu/nvtx_utils.h"

// method 1
{
  // ...
  tensorflow::profiler::RecordEvent pass_enevt("RunHloPasses");
  // ...
}

// method 2
tensorflow::profiler::ProfilerRangePush("RunBackend");
// ...
tensorflow::profiler::ProfilerRangePop();
- 在源码中引入nvtx打tag功能后,需要更改对应源码编译所需的BUILD文件,在其中加入
//tensorflow/core/profiler/lib:profiler_backends编译依赖。举例说明如下:- 在tensorflow/compiler/xla/service/gpu/gpu_executable.cc中使用nvtx打tag后,需要在tensorflow/compiler/xla/service/gpu/BUILD文件内容
cc_library(name = "gpu_executable", srcs = [..., "gpu_executable.cc", ...], ..., deps = [...])的deps域中添加一行"//tensorflow/core/profiler/lib:profiler_backends",编译依赖。
- 在tensorflow/compiler/xla/service/gpu/gpu_executable.cc中使用nvtx打tag后,需要在tensorflow/compiler/xla/service/gpu/BUILD文件内容
使用NVTX标识XLA执行过程
需要使用
pip install cupy-cuda11x安装cupy。
- 代码示例
1
2
3
4
5
6
7
8
9
10
11
12
13
14
15
16
17
18
19
20
21
22
23
24
25
26
27
28
29
30
31
32
33
34
35
36
37
38
39
40
41
42
43
44
45
46
47
48
49
50
51
52
53
54
55
56
57
# nvtx_xla.py
import numpy as np
from tensorflow.python.client import timeline
from tensorflow.python.compiler.xla import jit
import tensorflow.compat.v1 as tf

from cupy.cuda import nvtx
from cupy.cuda import profiler
from cupy.cuda import runtime

tf.disable_v2_behavior()

def nn_block(input_tensor_0):
    op_0_0 = tf.square(input_tensor_0)
    op_1_1 = tf.matmul(op_0_0, op_0_0)
    op_1_0 = tf.subtract(op_1_1, op_1_1)
    op_2_0 = tf.add(op_1_0, op_1_1)
    return op_2_0

def nn(input_tensor_0):
    for i in range(0, 1):
        tmp = input_tensor_0
        input_tensor_0 = nn_block(tmp)
    return input_tensor_0

def test_nvtx():
  x = tf.placeholder(tf.float32, [None, 2])
  with jit.experimental_jit_scope(compile_ops=True):
    output = nn(x)

  run_metadata = tf.RunMetadata()
  with tf.Session() as sess:
    tf.global_variables_initializer().run(session=sess)
    # init run
    data = np.array([[1, 2],
                     [3, 4]])
    res = sess.run(output,
             feed_dict={x: data},
             options=tf.RunOptions(trace_level=tf.RunOptions.FULL_TRACE),
             run_metadata=run_metadata)
    print(res)
    # profile start
    runtime.deviceSynchronize()
    profiler.start()
    for i in range(10):
      data = np.random.randint(5, size=(2, 2))
      nvtx.RangePush("Epoch " + str(i))
      res = sess.run(output,
               feed_dict={x: data},
               options=tf.RunOptions(trace_level=tf.RunOptions.FULL_TRACE),
               run_metadata=run_metadata)
      nvtx.RangePop()
    profiler.stop()
    # profile end

if __name__ == '__main__':
  test_nvtx()
- 执行脚本
1
2
3
4
5
6
7
8
9
#!/usr/bin/env bash
set -ex

CUDA_VISIBLE_DEVICES=0                                        \
TF_CPP_MIN_LOG_LEVEL=0                                        \
nsys profile -t cuda,nvtx,osrt,cudnn,cublas                   \
     -o profile_out --force-overwrite=true                    \
     --capture-range=cudaProfilerApi --capture-range-end=stop \
     python -u nvtx_xla.py
- 执行效果

XLA Client元算子
以下列举的XLA Client元算子类型来源于tensorflow/compiler/xla/client/xla_builder.h。
1
2
3
4
5
6
7
8
9
10
11
12
13
14
15
16
17
18
19
20
21
22
23
24
25
26
27
28
29
30
31
32
33
34
35
36
37
38
39
40
41
42
43
44
45
46
47
48
49
50
51
52
53
54
55
56
57
58
59
60
61
62
63
64
65
66
67
68
69
70
71
72
73
74
75
76
77
78
79
80
81
82
83
84
85
86
87
88
89
90
91
92
93
94
95
96
97
98
99
100
101
102
103
104
105
106
107
108
109
110
111
112
113
114
115
116
117
118
119
120
121
122
123
124
125
126
'Abs',
'Add',
'AfterAll',
'AllReduce',
'AllToAll',
'And',
'Atan2',
'BatchNormGrad',
'BatchNormInference',
'BatchNormTraining',
'BitcastConvertType',
'Broadcast',
'BroadcastInDim',
'Call',
'Ceil',
'Cholesky',
'Clamp',
'Clz',
'Collapse',
'CollectivePermute',
'Compare',
'Complex',
'ConcatInDim',
'Conditional',
'Conj',
'ConstantFromArray',
'ConstantFromArrayWithLayout',
'ConstantLiteral',
'ConstantR0',
'ConstantR1',
'ConstantR2',
'ConstantR2FromArray2D',
'ConstantR2FromArray2DWithLayout',
'ConstantR3FromArray3D',
'ConstantR3FromArray3DWithLayout',
'ConstantR4FromArray4D',
'ConstantR4FromArray4DWithLayout',
'Conv',
'ConvGeneral',
'ConvGeneralDilated',
'ConvWithGeneralDimensions',
'ConvWithGeneralPadding',
'ConvertElementType',
'Cos',
'CreateToken',
'CrossReplicaSum',
'CustomCall',
'CustomCallWithLayout',
'Div',
'Dot',
'DotGeneral',
'DynamicSlice',
'DynamicUpdateSlice',
'Eq',
'Exp',
'Expm1',
'Fft',
'Floor',
'Gather',
'Ge',
'GetDimensionSize',
'GetTupleElement',
'Gt',
'Imag',
'Infeed',
'InfeedWithToken',
'Iota',
'IsFinite',
'Le',
'Log',
'Log1p',
'Lt',
'Map',
'Max',
'Min',
'Mul',
'Ne',
'Neg',
'Not',
'Or',
'OutfeedWithToken',
'Pad',
'Parameter',
'PopulationCount',
'Pow',
'Real',
'Recv',
'RecvFromHost',
'RecvWithToken',
'Reduce',
'ReduceAll',
'ReducePrecision',
'ReduceWindow',
'ReduceWindowWithGeneralPadding',
'Rem',
'ReplicaId',
'Reshape',
'ReshapeWithInferredDimension',
'Rev',
'RngNormal',
'RngUniform',
'Round',
'Rsqrt',
'Scatter',
'Select',
'SelectAndScatter',
'SelectAndScatterWithGeneralPadding',
'SendToHost',
'SendWithToken',
'SetDimensionSize',
'ShiftLeft',
'ShiftRightArithmetic',
'ShiftRightLogical',
'Sign',
'Sin',
'Slice',
'SliceInDim',
'Sort',
'Sqrt',
'Sub',
'Tanh',
'Transpose',
'TriangularSolve',
'Tuple',
'While',
'Xor'